Wednesday, 4 June 2014

Being Cool and Being Safe

Hello all!
Summer is finally here! Yay! What is everyone looking forward to doing during the warm months? I am really hoping to spend more time outdoors enjoying the sun.
One way I love doing this is by biking instead of using my car so much. I rode my bike a bunch last year but unfortunately and kind of hilariously I fell off my bike early in the year and was scared to go back on for the rest of the summer. I don't know about anyone else but I am not the best bike rider and I always feel like I could possibly crash into everything haha. I feel 100% safer when wearing a helmet but I cannot handle how ugly every single helmet is. I know, I know, I really shouldn't care about this but I want to look at least a little bit cool while riding a bike. Thinking of ways to revamp a helmet, I came up with the simple idea of just painting on it! You could potentially paint whatever you want on your helmet to make it your own, just get crafty and have fun!


All you need for this project is some paint (make sure you get some waterproof and multipurpose paint, or if not, grab a sealer to make sure your paint does not chip or come off in the rain), some paint brushes and of course a helmet.
I picked mine up at wal-mart for about $30, if I didn't have such an odd sized head I could probably find one cheaper. I am sure you can!
All you do is start painting!
As you know, I enjoy anything that looks handmade so I like that these flowers are a little messy and different sizes. If you wanted something a bit more uniform you can just pick up a stencil or even just print one out.
There was this really ugly sticker on the front of my helmet so I just put a giant daisy over top of it. I almost wanted to put jewels over it but I thought it may be a little much, even for me.
I know this isn't for everyone but why not have a little fun while being safe!

Saturday, 26 April 2014

DIY Balm

I don't know about you but my lips and skin have taken a major beating this winter and even though the weather is getting nicer I am still dealing with many issues. I really am a firm believer that less is more when it comes to what you put on your skin and body. I was browsing the internet to find a simple balm I could make to use on parts of my body that need a little help getting back to normal, I got some ideas and came up with this!

All you need for this balm is beeswax, coconut oil, little containers and some essential oils that you like (I picked lemongrass, yum!)


The first thing you do is grate the beeswax. You need equal parts wax to coconut oil, so grate however much you need depending on how much balm you are making.


The next step is to add the coconut oil to the beeswax, remember equal parts of both! Make sure to use a bowl that you don't care too much about because the wax can turn into a crazy mess.


Put the bowl in the microwave until it is all melted into a liquid.

Add the essential oil (just a few drops) into your liquid and quickly pour into your little containers. It would be really cool if you had some vintage pill boxes to put your balm in, but I didn't so I used these little watch containers from Lee Valley.


Let the balm dry and you are done!

I used little dollies to wrap the containers that I just had laying around my place, vintage napkins or fabrics would be really cute as well. Remember packaging is the best part! Well in my opinion!


I was also inspired by the Free People blog to start looking into making my own skin care and makeup products. Have you checked it out? It is for sure one of my current obsessions!
http://blog.freepeople.com/

Enjoy!

Thursday, 6 March 2014

Flowers in my Hair

Winter has been way too long and I think at this point everyone needs a little bit of summer in their life. I wanted to post this super easy and fast DIY flower crown.
All you need for this project is some fake flowers, glue, elastic, ribbon or suede, and a sewing machine (optional)

The first thing you do is take the flowers off the wire stems so it is just the head of the flower.
The elastic I used for this was basically like a bra strap, all you need to do with this type of elastic is put the flowers through the little holes, add a little glue and you are good to go! If you are just using plain elastic you can make little holes or just use a little bit more glue to stick them in place.


The next thing you do is measure the size of suede or ribbon you want for your tie and cut it.
Then sew the two pieces of suede or ribbon to the elastic and you are done! If you don't have a sewing machine you could just use a strong glue to hold everything in place as well.


This project costs at the most $5, took me maybe 10 minutes to make and looks like something you can buy at Urban Outfitters.
I am going to be wearing mine this weekend pretending its July.


Monday, 3 March 2014

Favourite Second Hand Finds Part 2: My Mom

1. Print Shop Trays
These print trays are not only really cool looking but are also very practical. My mom got the idea of these from seeing something similar at Pottery Barn. She always had the beachy natural style to the house so this fits right in. The seashells were just collected from where ever and they look perfect displayed on this tray, I especially like how it is turned on its side to fit perfectly in this little nook.


The other tray is used in my mom's sewing room. She can't remember where the idea came from but is very useful to store all her thread. She actually collects a lot of spools of vintage thread so this can show them all off. I have one at my apartment with all my thread as well. My mom got her trays at Aberfoyle Antique Market in Guelph and at a garage sale for about $10 each. These things are around but do tend to be overpriced, so $10 is definitely a steal!


2. Embroidered Dress
My mom got this dress from The Salvation Army for $4-5. We have both always been a fan of handmade stuff and loved the look of these dresses for a few years. When my mom got this dress she only had to hem it and then she was good to go! She loves wearing this dress in the summer with tights, does it not scream summer or what! I have to say (so does she) she got this idea from me wearing them and I still claim she stole this dress from me.


3. Mat and Nat Purse
My mom likes big purses and had been looking for a big leather purse for the winter for quite awhile. I found this bag for my mom at a store I work at called Mine101. It is an awesome store that is run by the Women's Community House and all the money made goes to the children's programs at the shelter. This brand Mat and Nat is actually a vegan product made to look and feel like real leather. These bags are usually quite pricey so $20 was quite a bargain. She has had this bag for a few years and it is still going strong!


4. Wooden Bowl
This bowl is my mom's style exactly, natural, earthy and handmade. She got it at Value Village for under $10. She uses this bowl as a center piece on her dinning room table. It works well for all seasons. In the winter she puts pine cones in it, and in the summer she uses seashells. It is so oversized that it is all you need to jazz up a table and make it look really put together. My mom loves all the imperfections to it, making it look like a true one of a kind find.


5. Upcycled Chairs
When my dad moved his office upstairs my mom finally had her dinning room back. She really wanted to find some mismatched wooden chairs to match the eclectic look of the room. She got the chairs off Kijiji, they were 5 for $40, what a steal! She took them home and tore them apart! She re-covered the chairs using coffee bags she purchased at the market from The Fire Roasted Coffee Company for $2 each. She painted one of the chairs with left over paint she found in the basement. The coffee bags give these chairs a really cool pop of colour. The room has really muted colours so thie pink on the bags really brighten up the room and make the chairs stand out. Basically my mom furnished her dinning room table with a little bit of work and around $50.


And our all time favourite second hand finds....


Thursday, 27 February 2014

Vintage Book Love

Anyone else have a thing for vintage books?


I actually have to resist buying them all the time so I don't become a book hoarder. There are some I just needed to add to my book shelf.


Some are absolutely hilarious like this one!


I especially love the old children's books if you are into this kind of thing, old books are actually pretty easy to find and really cheap (if you are looking at the right places). I think this kind of thing would be really cool in a baby room.


Monday, 24 February 2014

Broken to Beauty

I just wanted to post this quick easy little DIY I did today.
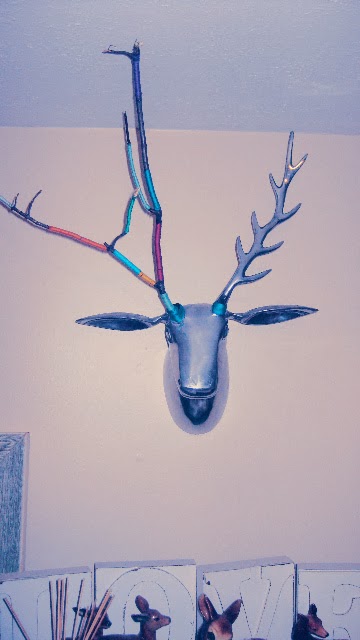
My mom bought me this huge deer head a couple weeks back from Home Sense with only one antler! I have always loved these over sized chrome deer heads but was definitely not willing to fork out $40-$50 on one for my place. This one was obviously really reduced to $10 and the person ringing my mom through probably thought she was insane buying this broken thing. During the holiday we always loved looking at the Roots windows where they decorated christmas trees with bright pompoms and wrapped really vibrate embroidery floss around sticks to create a really awesome take on the holidays. We pointed it out a few times thinking of different ways we could do something like this!

This is what I started with. A poor little one antlered deer.


I picked up a stick from outside and cut it down to what size I liked.


All I did is wrap different colour embroidery floss around the stick in various areas until I liked the way it looked. I used super glue to hold the ends in place.
I then taped the stick to the broken spot and made sure it would all be held together strongly. I wrapped the tape in embroidery floss until you couldn't see it anymore.
All done!


Thursday, 6 February 2014

Upcycling Boy Addition

I wanted to share with you a really cool upcycling project my brother Travis did.
Travis lives in Nova Scotia where he is attending school. He is pretty crafty himself and whenever he is home he often has some sort of project on the go. He definitely is into more industrial and rustic DIY projects which is a lot different from what my mom and I do. I love his style. I always love to see what he is working on. Over christmas break he was working on some leather coasters and a few summers ago he was making rings out of old coins.
He gave me this one for my birthday years back! I still love it!


The project I really want to tell you about is this bar he made last summer.


This bar is made all out of recycled wood, more specifically pallets. He took apart all of the pallets that him and my mom found on the side of the road, so basically wood for free! He stained all the wood with different colours and planned everything all out. He did all the staining and planning in London then brought everything back to Wolfville and put it all together.


I haven't seen the bar in person but the pictures look really awesome. I especially love the carvings, makes it look one of a kind!